Tuesday, September 3, 2019

We're Taking Requests

I posted a few photos of Zeus and Brutus to the MODA Facebook page the other day, mentioning that they were both generally "nigh" oxen.  That's the left side of a yoke of oxen if you're new to oxen.  They are near (nigh) to the teamster. 


What makes it unusual is that oxen prefer to work on one side for their entire lives.  The conventional wisdom for working cattle is that they have a partner for life and they work on one side exclusively.

Don't fall for it. 

Hershel and Walker, two of Tillers' Shorthorns were in a trailer accident 10 or more years ago.  It was pretty serious and Hershel injured his leg, putting him out of work temporarily.  A few weeks later, we had Harvest Fest and the team was going to plow as a demonstration.  Dulcy and some of the interns got Walker out and paired him with Marco (another mature ox who also had only ever worked on the nigh side, like Walker). 

They had them out once. 

That weekend, one of the interns and I plowed for the afternoon in front of a crowd using Walker, with Marco as the off-ox.  They weren't fantastic, but they weren't bad, either.  That put the matter to rest for me. 

So back to Zeus and Brutus:  Kendy Sawyer commented on the photos, saying she'd like to see them working with a pole between them.  10 minutes after I saw the comment, I was out with a camera on a tripod.  See for yourself. 


The disclaimers and reflections:

1.  I edited out me walking back and forth to the camera and one redundant shot.  That's it.  You get basically a real-time view of how things went, warts and all.

2.  The task isn't quite so monumental, as they are housed in the same paddock 24/7, 365.  Two unfamiliar animals might have a bit of a rodeo quality to them in a yoke.

3.  They aren't super sharp with their moves, but half of that - at least- is me trying to figure out how to combine the commands that each expects.  A better teamster would get better results sooner.  Go figure.

4.  The tongue confused Zeus, but only a little.  He works singly, so the rubbing of something on either leg is not an issue.  If he hadn't done that already, confusion could quickly shift to annoyance and on to panic in a hurry. 

5.  We got the cart hooked, moved, backed, loaded, navigated and unloaded - without hitting anything.  Anything beyond that is gravy anyway.

6.  It is SUPER helpful to put a camera on yourself to drive.  It forces you to "see yourself" as you are working.  Plus, going back to watch things, painful as it may be, is how we get better, faster. 

7.  I, you, or we should have a "request line" to have people ask to see something demonstrated - particularly something we can't do yet.  Watching someone with experience learn a skill in real time would be a tremendous asset to the craft of ox-driving. 

Who's in?


Thursday, July 11, 2019

The Scientific Method

“Science, my boy, is made up of mistakes, but they are mistakes which it is useful to make, because they lead little by little to the truth.” 
― Jules Verne, Journey to the Center of the Earth

The advice I regularly throw out to new teamsters is to drive all oxen singly, as an insurance policy against a team suddenly becoming a useless single ox due to injury or death, whenever you get them out to work.  

I do this on the way back to the paddock from the hitching post at a bare minimum, although these days I halter each animal and drive them to the hitching post as well.  The thinking is that they want to go back anyway, so the task is pretty well defined.  Plus, those few starts and stops, gees and haws, help reinforce each's individual performance.  

*Tangent alert* When I teach the scientific method to high schoolers in my psychology class I often use this coaching example:  If I completely revamp our training plan for the off season, adjust our weekly workouts during the season, book us at a new meet, move some runners from varsity to JV and vice-versa, and have a runner skip breakfast and then run a personal best, I'd have a hard time believing that her new socks she wore really are "lucky socks."  

In science, you change one variable at a time to determine its effect.  

The other night, since my son was home in the evening, I had him come out and film me walking Cassius back to the paddock, figuring it would be a good chance to shoot a tutorial on this for a Youtube series (thanks Jim Gronau for the idea!).

Normally, we work alone at home, the dog is inside, the teenager isn't following along behind, Cassius goes second (so he knows he's re-entering the paddock and he's re-entering his herd), and the flies are usually fewer.  

What if all of that changed?  Which thing would cause him to act up so badly? (see the video evidence)  Your guess is as good as mine.  The next night he was perfect when the routine was back to normal. 

I guess I'll have to adjust one thing at a time and see what is the effect.  Like a scientist.  

Thursday, April 11, 2019

Without Drama

Tillers' founder Dick Roosenberg often advises students of ox driving that a good way to approach plowing with a team is to remember that, when learning, the goal is not to plow.  The goal is to learn to plow.

I'd assume that the same logic would apply to other tasks:  Learn the task while acclimating the animals to the task.

Last week at Bent's Fort, we worked through the steps I like to follow when hitching to an unfamiliar object.  They may be overkill, but avoiding drama in hitching is a noble pursuit for both team and teamster.

Clark and Coolidge are quite used to pulling wagons and carts, both of which have a tongue.  I wasn't sure, though, that they were used to a chain. (In hindsight: of course they're used to a chain.  But I prefer a belt-and-suspenders approach)  Oxen are much more likely to tangle their feet in a chain and the bouncing and rattling motion chain makes some animals nervous.  Plus, wheeled vehicles and dragging objects sound different.

So we used these steps.  Feel free to modify at your discretion and as they apply to other "new" objects (wagons, mowers, rakes, carts, single yokes, brichen, etc.):

1. Rattle the chain around the team.

2.  Let them sniff the chain.

3.  Drag the chain away from the team.  This is an especially good strategy for new teams.  The object can make all the noise it wants, but as it heads away it's not perceived as a predatory threat.  With calves, half the time they get curious and "chase" the object.

4.  Drag the chain between the animals.  Chains look like snakes.

5. Hook the chain to the yoke.

6.  Hook the chain to the load (in our case a log, then later a 6-pound Napoleon cannon!)

7.  Step the team up one step and stop them.  I like to make that initial step glacial.  The moment they lean into the load I'm already whoaing them.  The goal is that the load makes a little noise, then immediately stops making noise and "chasing them."  To step right out quickly with rattling chains and noisy predators following, then chasing the team, you can get into a rapidly accelerating feedback loop in a hurry.  (Ask me how I know this!)

8.  Step the team up a couple of steps and stop them.

9.  Step the team up to walking pace then stop them.

Overkill?  Sure, but that always beats a runaway team.  If, at any step in the process, the team seems skittish, I like to unhook them and walk around a minute then go back to the "new" thing.  Cattle seem to have a sense that any new change is a permanent change.  Sort of, "Once I'm hooked to this wagon or wearing this yoke, my life will become nothing but this."  They can't envision a time in the future being unhooked, so it is reasonable for them to start thinking of escape.  A team looking to escape is unreliable.  Always.

"Recovering" a team that had a bad experience would follow the same process, just slower, maybe taking three to five sessions to acclimate the animals to the frightening object.  But what's the alternative?

One additional caveat for wheeled vehicles:  When the team stops, the vehicle keeps moving.  The first time this happens and the cart runs up on the team, they can panic and bolt.  The cart remains attached and "chases" them - like any good predator does - and that feedback loop accelerates in no time.  Mr. Roosenberg advises to always start new teams on carts heading UP a gentle incline to lessen the likelihood of this happening.

Clark and Coolidge really didn't need these steps, but moving slower to get farther, in the long run, makes sense.

No drama.


Tuesday, April 9, 2019

Walk a Straight Line


 'You stood on the shoulders of geniuses to accomplish something as fast as you could, and before you even knew what you had, you patented it, and packaged it, and slapped it on a plastic lunchbox, and now you wanna sell it.' - Ian Malcolm Jurassic Park Movie

“And because you can stand on the shoulders of giants, you can accomplish something quickly.” 
 Michael Crichton, Jurassic Park Book

Here I come, there Coolidge goes.
I don't have much original thought in ox driving.  I don't feel bad about this either.  I stand on the shoulders of giants.  Dulcy Perkins, the best teamster you'll ever come across, taught me, along with help from Rob Burdick.  Dick Roosenberg allowed me to observe his driving and teaching for years.  Vicki Solomon, Abby Johnson and Tim Harrigan each offered insightful advice in bite-sized pieces.  Howie and Andrew VanOrd poked and prodded my thinking on a number of topics.  Dale Parsons stood back and let my mistakes happen, offering support.  Anna Dirkse and Ivy Pagliari wove their teaching in alongside mine, gently correcting my problems or offering alternate-and-generally-more-successful strategies to accomplish tasks.  Marco and Polo made me look good when I wasn't, Hershel and Walker humbled me when I thought I had it, and Stan and Roy helped me to see what a team could really do.

Giants, I say.


Having said that, I have one original thought:  Walk a straight line.  At least until you shouldn't.  

Teamsters should walk straight lines while the animals should walk arcs.  When making a turn, for example, a right-handed turn, pick a spot to head to and simply to it.  The team should avoid you and, by doing so, they must make an arc.  The tighter the turn. the more it matters that you walk directly.


Try it.  You may have been doing it for years without thinking about it, but it works wonders for helping beginners to make tight turns on day one.  

Now stop walking straight lines.  Abby Johnson explained at the MODA Gathering a couple of years ago that getting a halter and heading towards an animal with intention is a recipe for the animal wandering off.  The fix is to meander a bit, approach in a seemingly unintentional way, like a nerdy kid moving in the hallway to "accidentally" bump into the cute girl.  (my metaphor not Abby's. . . I spent more time than I care to remember in one of those roles)


At Bent's Fort last week, this tip came back multiple times, as Clark and Coolidge had learned to avoid being haltered.  The meandering walk, along with lots of gentle brushing both in the corral and at the hitching post, returned them to an easy-to-catch team.  

There it is: My original thought.  Walk a straight line.  At least until you shouldn't.

Molly the Mule wants in on the brushing.

Monday, April 8, 2019

Stealthy Yoke Fashion Show


68 and sunny after school today, so Brutus and Cassius tried out their new yoke on a trip around the yard.  It's the 11-inch elm yoke, which has been my nemesis since June of 2017.  It's 95% done.  Some thoughts:

The boys aren't quite into an 11, but the 11-inch beam with their "old" 10-inch bows may be workable.

We won't know if the size is workable until we hook to something.


The new yoke needs hardware.

The plate and rings from the old yoke should bolt right on.

Double sided tape won't hold the hardware.  (No, I didn't try.)

The new yoke needs the holes drilled for the plate bolts.


Scary Beasts!
Without hardware, a team of oxen makes considerably less noise walking along.

The new yoke sure is a pretty stick of wood.


Sunday, April 7, 2019

Stick out your Tongue

I like to work with two rings on a yoke: a "big ring" for the tongue and a "calabash," or a "grab ring" for the chain.  (They also go by the name "bitch link.") With that set-up, chains are no problem - even without a hook on the end - and the tongue to a cart or wagon is carried in the big ring while a chain carries all the draft, extending the life of the tongue.

But both the freight wagon and the caretta at Bent's Fort have a different tongue.  While it has a traditional tongue stop below, the load is carried by a loop of iron which passes through a pair of holes in the tongue.  Two cotter pins hold the loop in.

It's fast to hook and unhook, but I'm not sure the origin and would also like to see anyone's historic photo or drawing of it in use, just to be sure we weren't missing something about the hitching process.


Saturday, April 6, 2019

Experts


I'm an expert on oxen. . . .As long as we define it like Mark Twain, who called an expert "An ordinary fellow from another town," and Will Rogers, who refined it as "A man fifty miles from home. . .with a briefcase."  By those definitions, I'm an expert here, away from home.

I'm writing this in the Denver Airport on my way back home from La Junta, Colorado and Bent's Old Fort.  I've been here for the week with my son, Lance, working with the staff at the fort and their team of Milking Devons, Clark and Coolidge.
The class was a "remote" version of Tillers' Oxen Basics.

We had a great and fulfilling week.  For the next few entries, plan on reading self-aggrandizing accounts of the successes.

I had no briefcase, but my two backpacks may have been sufficient.


Wednesday, February 13, 2019

The Yoke Bench

Clamping a small yoke to a bench for shaping and carving is awkward, but not difficult. A traditional holdfast does the job without fuss.
Gramercy holdfasts.  I made my own. They're ugly.

For carving a big yoke, the increased mass keeps it in place for some light carving, but not for heavy shaping, such as when planing with a fore plane.  Here, the increased size makes clamping more difficult.

Sawbench- from lostartpress.com
I'm not sure what the traditional method would have been for holding a yoke beam in Colonial times, but most cabinet shops of that period would have used a traditional workbench, along with a pair of "sawbenches," low, flat platforms of about knee height used for handsawing boards.


Ok, check that.  I do strongly suspect how they would have held the beam.  At least since Medieval times, low benches have been the way to hold big chunks of wood.  (see photo from Burgundy, where they're building a castle. . . while I complain non-stop about carving a yoke.  A castle.)

Since my shop has a pair of sawbenches, I decided to try them to make a "Yokebench."  The yoke sits atop, and spans, the sawbenches.  The yokemaker straddles the beam, with bodyweight providing clamping force.

If I was going into production yoke making, I'd saw two inches off the legs of my sawbenches for easier mounting and dismounting and a little more leverage from the floor, but as it is, the height works well enough.

Tuesday, February 12, 2019

Goadinanhour.

How fast can you make a goad?  

Since this winter is providing weather as if we're on "Let's Make a Deal," (Behind door #3 today, we find an ice storm!) I was home from school again today.  After chores, I stopped at the woodshop.  Outside the door, a white oak board lay there, looking for all the world like it had straight grain along one side.  

A quick pass over the jointer and the board kept up its ruse.  

I ripped out two 1" by 1" blanks, each 4 feet long and toted them inside to the basement shop.  At this point, the jig was up and a knot, some twisting grain and a reversing-grain section became evident.  

I figured I was working on "free time" this morning, so I looked the other way on the grain issues and tapered one down to about 9/16" at the one end, using a foreplane.  


From there, the same plane made quick work of the corners. Then I had a wonky, tapered octagon.  Three quick rounds of "shade-in-the-high-spots-with-a-pencil-then-plane-off-the-pencil-marks" and I had a smoothly tapered octagonal stick.  

10 minutes at the shaving horse and a lapful of shavings and the stick was nearly round.  

4 sloping ripcuts in the butt-end of the stick resulted in 4 points useful for keeping the nigh ox from crowding me, a-la Ray Ludwig's twisted goads.

A little sanding,  trimming of the points with a chisel, wiping a coat of polyurethane on the handle, wrapping the shaft with electrical tape, and carving the end with a knife finished it off.

Less than 60 minutes.  About the same length as "Let's Make a Deal."


Saturday, February 9, 2019

Blissful Ignorance

Everybody's got an opinion.  Ask them, they'll tell you.  Shoot, don't ask them and they'll often tell you.

But there I go.  Interviewing people.  Experts in ox-driving.  

It always comes back to haunt me.

In the "Polar Vortex" last week, I got a lot of writing and editing of interviews done, including spending a little time with this passage in Brandt Ainsworth's interview from last year:

I drive with a goad, but I like a lash and I respect people who are good with a lash.  It’s kind of like a head yoke to me: I’ve always had an interest in that and I’ve wanted to develop that skill.  The reason I started with a goad was that it was simpler, and I know it was Howie Van Ord that told me, traditionally people who work in the woods use a goad stick, . . . I can definitely see the advantages of a lash, but you have to develop that skill, too. I really believe in - whether it’s a goad or a lash - being very accurate with where you touch them. I think if you’re very accurate and well-timed, you need very little force.  


I don’t know if you saw today, but driving that team, they were turning, they were not behaving.  I think the near ox, Pollux, was being bad, and I got him at the perfect time right on the neck where I intended to, just a little rap, a flick of the wrist, but it got his attention at the perfect time and I hit him exactly where I wanted to - kind of behind the ears and the head of the yoke - and he turned and I had their attention.  I think whichever you use, you should kind of have that accuracy. I think if I switched to a lash it would take me months to develop that accuracy and I’d be pretty frustrated. . .

Last Saturday, Brutus, Cassius, and I were out moving barn manure to the pile, using a slip scraper. Lost of trips and lots of maneuvering around the yard with a team that hadn't been out much lately.

Long story short, my lash work wasn't getting it done. Thinking of that interview excerpt, I switched over to a goad, shut my mouth, and concentrated on being accurate with the commands.

Things improved.

The moral of the story: Never ask anyone anything. You'll never confront the moments where you're coming up short. You'll never be burdened with having to improve.

There's a reason they call it "blissful ignorance."

Or maybe. . .


Butterflies

The big elm yoke blank should be dry.  John Sarge stored it inside at least a couple of years, then it sat in Tillers' shop for a year, then it sat in my outdoor shop for a few months.  Once the rough shaping was done, I brought it into my basement shop.  Then it happened.

A check.  Not deep, but long.  All across the belly and spanning the neck seat on one side.  Maybe it won't get worse, but there's a lot of work in a blank that big, so fixing it now seemed the better course.

John Sarge jokes that one of Tillers' yokes has been repaired so often that there is more Bondo than yoke in it now, but automotive dent filler is not really in my wheelhouse.  I'm a woodworker, so WWWD:  What would a woodworker do? 

Butterfly keys.

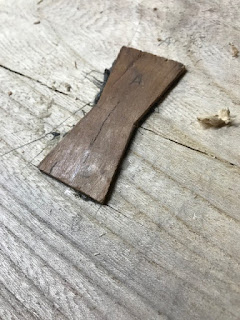
Shaped like an opposing pair of dovetails, the keys hold a check or a split together.  The particulars of shape and angle aren't critical, so long as the butterfly is cut along the grain and then placed across the grain of the split. 

I started with a 2 1/2" length of cherry and cut out a key with a handsaw.  I debated walking out to the shop to use the bandsaw for the cut.  I'm glad I didn't.  A dovetail cut is a dovetail cut.  (see photo) Then I smoothed the edges
with a chisel while creating a very slight bevel.  Think of the butterfly like a cork in a wine bottle and you get the idea. 

The next step was to lay the key across the split and trace it carefully.  I bored a few 5/8" holes in the "hole" area of the key to remove most of the material from the hole, then chiseled up to the lines I had traced.  Finally, I used a router plane to (mostly) flatten the bottom of the hole to a consistent depth.  The small recesses where the lead screw of the drill bit left a mark? I left those to give excess glue a place to go.

For glue, I chose a 2-part epoxy.  The combination of strength and the ability of epoxy to fill in gaps made it a logical choice.  I most often use hide glue for woodworking, but it's not water-or-heat resistant.  And the waterproof woodworking glues only bond on surface-to-surface contact.  My "cork" bevel would result in a tight fit at the surface, but would leave the possibility of a slight gap below.

After mixing and spreading the epoxy, a hammer and a
block of wood drove in the key. 24 hours later, I planed off the part of the key that was proud of the hole and used a scraper to level the surface.

It looks pretty good. 

Does it work?

I'll let you know in a few years.  

Sunday, February 3, 2019

Dawks

A Sargent 414, the "off-brand" Stanley #5
The big elm yoke could have been done weeks ago, perhaps months.  Ok, more like a year.

Inadvertently, the process of shaping one section, then writing about it has me exploring different methods some traditional, others unconventional.  

Last week, I smoothed one side of the belly,  just a gentle, fair curve.  Starting with a circular saw, then following up with the Excaliber blade in the angle grinder - you know, like the pioneers did -  resulted in a cratered surface like that of the moon.  From there, I did the secondary fairing of the curve with a cheap Stanley Surform rasp blade in a shopmade holder.  For lots of woods, this works well.  Not so with elm.  The shavings are stringy and bunch together, clogging the rasp every few strokes.  

Starting on the other side this week, I searched for an easier (read: faster) option.  That option had been waiting for, oh, 250 years or more:  a fore plane.
The curved blade, across the grain, takes a hefty bite.


Fore planes are medium-sized bench planes that fall between shorter "smoothing" planes and longer "jointing" planes.  The most common example is a Stanley #5.  

To coax the magic from a fore plane, do two things:  First, grind the blade to a curve with about a 10" radius, which allows the tool to bite aggressively.  Second, work it across the grain.  

The first tip takes a wee bit of skill at the grinder, but you'll think you can, and just like the little engine, you will.  

The second requires a leap of faith.  Across the grain?  Are you nuts?  Maybe, but 10 minutes, maybe 15, of shaping and the process is complete.  Half the time of the other side.  


Dawks, close-up
The resulting surface is made of lots of small cross-grain grooves, historically known as "dawks."  A spokeshave easily smooths them.  

Don't have a foreplane?  Go t0 10 garage sales and take $20 bucks.  You'll end up with one. . . and a few dollars left for tacos.  

Friday, February 1, 2019

Carve a Spoon Yoke

"It's the first few thousand miles.  After that, a man gets limber with his feet." - Buster Kilrain, a fictional footsoldier in The Killer Angels and the movie Gettysburg.


After you've carved a few yokes, the ability to read the wood and the direction to cut with an edge tool like a spokeshave, drawknive, ax, adze, or chisel starts to come along.  Also, the value in carving "green wood," fresh cut material with more moisture in it, becomes apparent.

In other words, by the time you've finished the last yoke you'll ever need to make, you're ready to make yokes.  Handy, isn't it?

To fix this dilemma, start by carving small yokes, which come disguised as spoons.  Spoons have curves- just like yokes.  Spoons are carved with edge tools- just like yokes.  Spoons can be primitive yet functional, or fancy as the day is long- well, you get the idea.  


But unlike yokes: you can make a spoon in about an hour, if you screw it up, you can burn the evidence and not feel too badly, and you can present the finished product to people who don't have oxen without awkward responses.  ("Gee, thanks for the fancy ox yoke. . .I'll treasure it always and it will look great in my apartment with my cats. . .")

I stopped to visit my mom and dad yesterday, absconding with a small piece of maple from their firewood box.  With a couple of hours yesterday and today, I roughed out two spoons, one hideous, one merely ugly.  Both are left-handed.  But each gave a good lesson in reading grain direction.  


Ironically, in carving a spoon, I had to work around the big elm yoke, still unfinished.