Wednesday, February 13, 2019

The Yoke Bench

Clamping a small yoke to a bench for shaping and carving is awkward, but not difficult. A traditional holdfast does the job without fuss.
Gramercy holdfasts.  I made my own. They're ugly.

For carving a big yoke, the increased mass keeps it in place for some light carving, but not for heavy shaping, such as when planing with a fore plane.  Here, the increased size makes clamping more difficult.

Sawbench- from lostartpress.com
I'm not sure what the traditional method would have been for holding a yoke beam in Colonial times, but most cabinet shops of that period would have used a traditional workbench, along with a pair of "sawbenches," low, flat platforms of about knee height used for handsawing boards.


Ok, check that.  I do strongly suspect how they would have held the beam.  At least since Medieval times, low benches have been the way to hold big chunks of wood.  (see photo from Burgundy, where they're building a castle. . . while I complain non-stop about carving a yoke.  A castle.)

Since my shop has a pair of sawbenches, I decided to try them to make a "Yokebench."  The yoke sits atop, and spans, the sawbenches.  The yokemaker straddles the beam, with bodyweight providing clamping force.

If I was going into production yoke making, I'd saw two inches off the legs of my sawbenches for easier mounting and dismounting and a little more leverage from the floor, but as it is, the height works well enough.

Tuesday, February 12, 2019

Goadinanhour.

How fast can you make a goad?  

Since this winter is providing weather as if we're on "Let's Make a Deal," (Behind door #3 today, we find an ice storm!) I was home from school again today.  After chores, I stopped at the woodshop.  Outside the door, a white oak board lay there, looking for all the world like it had straight grain along one side.  

A quick pass over the jointer and the board kept up its ruse.  

I ripped out two 1" by 1" blanks, each 4 feet long and toted them inside to the basement shop.  At this point, the jig was up and a knot, some twisting grain and a reversing-grain section became evident.  

I figured I was working on "free time" this morning, so I looked the other way on the grain issues and tapered one down to about 9/16" at the one end, using a foreplane.  


From there, the same plane made quick work of the corners. Then I had a wonky, tapered octagon.  Three quick rounds of "shade-in-the-high-spots-with-a-pencil-then-plane-off-the-pencil-marks" and I had a smoothly tapered octagonal stick.  

10 minutes at the shaving horse and a lapful of shavings and the stick was nearly round.  

4 sloping ripcuts in the butt-end of the stick resulted in 4 points useful for keeping the nigh ox from crowding me, a-la Ray Ludwig's twisted goads.

A little sanding,  trimming of the points with a chisel, wiping a coat of polyurethane on the handle, wrapping the shaft with electrical tape, and carving the end with a knife finished it off.

Less than 60 minutes.  About the same length as "Let's Make a Deal."


Saturday, February 9, 2019

Blissful Ignorance

Everybody's got an opinion.  Ask them, they'll tell you.  Shoot, don't ask them and they'll often tell you.

But there I go.  Interviewing people.  Experts in ox-driving.  

It always comes back to haunt me.

In the "Polar Vortex" last week, I got a lot of writing and editing of interviews done, including spending a little time with this passage in Brandt Ainsworth's interview from last year:

I drive with a goad, but I like a lash and I respect people who are good with a lash.  It’s kind of like a head yoke to me: I’ve always had an interest in that and I’ve wanted to develop that skill.  The reason I started with a goad was that it was simpler, and I know it was Howie Van Ord that told me, traditionally people who work in the woods use a goad stick, . . . I can definitely see the advantages of a lash, but you have to develop that skill, too. I really believe in - whether it’s a goad or a lash - being very accurate with where you touch them. I think if you’re very accurate and well-timed, you need very little force.  


I don’t know if you saw today, but driving that team, they were turning, they were not behaving.  I think the near ox, Pollux, was being bad, and I got him at the perfect time right on the neck where I intended to, just a little rap, a flick of the wrist, but it got his attention at the perfect time and I hit him exactly where I wanted to - kind of behind the ears and the head of the yoke - and he turned and I had their attention.  I think whichever you use, you should kind of have that accuracy. I think if I switched to a lash it would take me months to develop that accuracy and I’d be pretty frustrated. . .

Last Saturday, Brutus, Cassius, and I were out moving barn manure to the pile, using a slip scraper. Lost of trips and lots of maneuvering around the yard with a team that hadn't been out much lately.

Long story short, my lash work wasn't getting it done. Thinking of that interview excerpt, I switched over to a goad, shut my mouth, and concentrated on being accurate with the commands.

Things improved.

The moral of the story: Never ask anyone anything. You'll never confront the moments where you're coming up short. You'll never be burdened with having to improve.

There's a reason they call it "blissful ignorance."

Or maybe. . .


Butterflies

The big elm yoke blank should be dry.  John Sarge stored it inside at least a couple of years, then it sat in Tillers' shop for a year, then it sat in my outdoor shop for a few months.  Once the rough shaping was done, I brought it into my basement shop.  Then it happened.

A check.  Not deep, but long.  All across the belly and spanning the neck seat on one side.  Maybe it won't get worse, but there's a lot of work in a blank that big, so fixing it now seemed the better course.

John Sarge jokes that one of Tillers' yokes has been repaired so often that there is more Bondo than yoke in it now, but automotive dent filler is not really in my wheelhouse.  I'm a woodworker, so WWWD:  What would a woodworker do? 

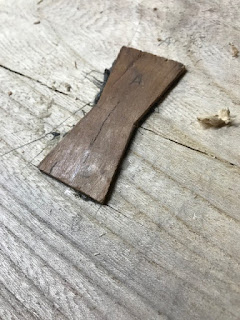
Butterfly keys.

Shaped like an opposing pair of dovetails, the keys hold a check or a split together.  The particulars of shape and angle aren't critical, so long as the butterfly is cut along the grain and then placed across the grain of the split. 

I started with a 2 1/2" length of cherry and cut out a key with a handsaw.  I debated walking out to the shop to use the bandsaw for the cut.  I'm glad I didn't.  A dovetail cut is a dovetail cut.  (see photo) Then I smoothed the edges
with a chisel while creating a very slight bevel.  Think of the butterfly like a cork in a wine bottle and you get the idea. 

The next step was to lay the key across the split and trace it carefully.  I bored a few 5/8" holes in the "hole" area of the key to remove most of the material from the hole, then chiseled up to the lines I had traced.  Finally, I used a router plane to (mostly) flatten the bottom of the hole to a consistent depth.  The small recesses where the lead screw of the drill bit left a mark? I left those to give excess glue a place to go.

For glue, I chose a 2-part epoxy.  The combination of strength and the ability of epoxy to fill in gaps made it a logical choice.  I most often use hide glue for woodworking, but it's not water-or-heat resistant.  And the waterproof woodworking glues only bond on surface-to-surface contact.  My "cork" bevel would result in a tight fit at the surface, but would leave the possibility of a slight gap below.

After mixing and spreading the epoxy, a hammer and a
block of wood drove in the key. 24 hours later, I planed off the part of the key that was proud of the hole and used a scraper to level the surface.

It looks pretty good. 

Does it work?

I'll let you know in a few years.  

Sunday, February 3, 2019

Dawks

A Sargent 414, the "off-brand" Stanley #5
The big elm yoke could have been done weeks ago, perhaps months.  Ok, more like a year.

Inadvertently, the process of shaping one section, then writing about it has me exploring different methods some traditional, others unconventional.  

Last week, I smoothed one side of the belly,  just a gentle, fair curve.  Starting with a circular saw, then following up with the Excaliber blade in the angle grinder - you know, like the pioneers did -  resulted in a cratered surface like that of the moon.  From there, I did the secondary fairing of the curve with a cheap Stanley Surform rasp blade in a shopmade holder.  For lots of woods, this works well.  Not so with elm.  The shavings are stringy and bunch together, clogging the rasp every few strokes.  

Starting on the other side this week, I searched for an easier (read: faster) option.  That option had been waiting for, oh, 250 years or more:  a fore plane.
The curved blade, across the grain, takes a hefty bite.


Fore planes are medium-sized bench planes that fall between shorter "smoothing" planes and longer "jointing" planes.  The most common example is a Stanley #5.  

To coax the magic from a fore plane, do two things:  First, grind the blade to a curve with about a 10" radius, which allows the tool to bite aggressively.  Second, work it across the grain.  

The first tip takes a wee bit of skill at the grinder, but you'll think you can, and just like the little engine, you will.  

The second requires a leap of faith.  Across the grain?  Are you nuts?  Maybe, but 10 minutes, maybe 15, of shaping and the process is complete.  Half the time of the other side.  


Dawks, close-up
The resulting surface is made of lots of small cross-grain grooves, historically known as "dawks."  A spokeshave easily smooths them.  

Don't have a foreplane?  Go t0 10 garage sales and take $20 bucks.  You'll end up with one. . . and a few dollars left for tacos.  

Friday, February 1, 2019

Carve a Spoon Yoke

"It's the first few thousand miles.  After that, a man gets limber with his feet." - Buster Kilrain, a fictional footsoldier in The Killer Angels and the movie Gettysburg.


After you've carved a few yokes, the ability to read the wood and the direction to cut with an edge tool like a spokeshave, drawknive, ax, adze, or chisel starts to come along.  Also, the value in carving "green wood," fresh cut material with more moisture in it, becomes apparent.

In other words, by the time you've finished the last yoke you'll ever need to make, you're ready to make yokes.  Handy, isn't it?

To fix this dilemma, start by carving small yokes, which come disguised as spoons.  Spoons have curves- just like yokes.  Spoons are carved with edge tools- just like yokes.  Spoons can be primitive yet functional, or fancy as the day is long- well, you get the idea.  


But unlike yokes: you can make a spoon in about an hour, if you screw it up, you can burn the evidence and not feel too badly, and you can present the finished product to people who don't have oxen without awkward responses.  ("Gee, thanks for the fancy ox yoke. . .I'll treasure it always and it will look great in my apartment with my cats. . .")

I stopped to visit my mom and dad yesterday, absconding with a small piece of maple from their firewood box.  With a couple of hours yesterday and today, I roughed out two spoons, one hideous, one merely ugly.  Both are left-handed.  But each gave a good lesson in reading grain direction.  


Ironically, in carving a spoon, I had to work around the big elm yoke, still unfinished.